July 19, 2024, 02:22:09 PM

Author Topic: Modelling bits for 3d printing  (Read 110332 times)

Offline Lex

  • Global Moderator
  • Full Member
  • ***
  • Posts: 1451
  • I wonder...
    • Loc: Bergen op Zoom, Netherlands
    • Warmuster . BitzBox
Re: Modelling bits for 3d printing
« Reply #90 on: August 04, 2014, 03:47:10 PM »
I meant the houds

Offline Malika

  • Full Member
  • *
  • Posts: 1563
    • Loc: Netherlands
    • Bits Blitz
Re: Modelling bits for 3d printing
« Reply #91 on: August 06, 2014, 02:23:37 PM »
Little update on the Skyrays (working title):


The main design is ready, now it's basically detailing and fixing some stuff here and there.

I kinda noticed I'm working in packs of 5 when designing these robotic creatures, if you'd then cut up the models the variations could be endless. I would love to do some robotic trees, but also larger creatures and even weirder stuff like robotic ghouls/zombies (basically undead humans with robotic insides), but for that I'd need to improve my digital sculpting skills a bit. Well...I did get Sculptris, so maybe I'll figure it out eventually...
Bits Blitz - the place to be for all your bits needs!

Offline Malika

  • Full Member
  • *
  • Posts: 1563
    • Loc: Netherlands
    • Bits Blitz
Re: Modelling bits for 3d printing
« Reply #92 on: August 08, 2014, 01:06:49 PM »
The madness must go on...


I've been continuing on the hounds. First of all by putting them on 40mm round bases to get an idea how they'd be like when printed. Furthermore I've moved their tails a bit more to the back rather than being on top of the back. Another thing I did was that I increased the size of their frontal bodies a bit to make them chunkier looking. The previous version ended up looking a bit as if they had way larger butts than front. I might have to adjust the back of the body a bit too to further reinforce this.


I changed the pose of one of the hounds. He felt a bit too static to me in its previous incarnation, and since (a) we've already got one in a static pose (firing its nasty mouth weapon) and (b) these are supposed to be really menacing mechanic creatures from nightmares, I felt the pose needed a change, something more intimidating.

I'll be working on theirs legs in the coming days/weeks. :D


The skyrays have also been touched up a bit, I've beefed up their bodies a bit to make the tail look slimmer. I think one of them with the round blades (one with the energy weapon on the left) will probably have those round blades replaced for the more chainsword tip kind like the other ones, furthermore the double barrels of the autogun like weapons will also be pushed in a bit deeper into the hull, making them stick out less.
Bits Blitz - the place to be for all your bits needs!

Offline Geep

  • Full Member
  • *
  • Posts: 900
Re: Modelling bits for 3d printing
« Reply #93 on: August 08, 2014, 01:23:47 PM »
It's hard to see the hound tail change, but I like the idea.
I prefer the round blades on the sky rays.

That woman has guts to be casually staring down a robo-dog like that.

Offline Malika

  • Full Member
  • *
  • Posts: 1563
    • Loc: Netherlands
    • Bits Blitz
Re: Modelling bits for 3d printing
« Reply #94 on: August 08, 2014, 01:30:16 PM »
The round blades are cool, that's not so much the problem. What's bugging me is that they make the gun barrels (be it the energy weapon or autoguns) stick out way too much for my tastes, thereby kinda losing the whole manta/ray feel these creatures supposed to have.
Bits Blitz - the place to be for all your bits needs!

Offline Geep

  • Full Member
  • *
  • Posts: 900
Re: Modelling bits for 3d printing
« Reply #95 on: August 08, 2014, 03:05:53 PM »
That's a fair point. In my experience rays are also a lot thinner in the tail. I know this is restricted by moulding requirements, so maybe make the bodies extra wide?

Offline Malika

  • Full Member
  • *
  • Posts: 1563
    • Loc: Netherlands
    • Bits Blitz
Re: Modelling bits for 3d printing
« Reply #96 on: August 11, 2014, 07:55:16 AM »
I think making the tail one or two segments longer will change a lot. As for making the bodies wider, I haven't considered it yet, but I might experiment a bit with that!

In the meantime I've been working on some terrain again...


In theory it could be a modular kit, I mean, it consists of many small parts such as the wall panels, corner pieces, floors, etc. If I were to design some other buildings, the parts would be fully compatible. The challenge with this however is to make it all affordable, especially since it doesn't have the awesome level of detail like lets say the fantasy kits by Tabletop World.
Bits Blitz - the place to be for all your bits needs!

Offline Malika

  • Full Member
  • *
  • Posts: 1563
    • Loc: Netherlands
    • Bits Blitz
Re: Modelling bits for 3d printing
« Reply #97 on: August 13, 2014, 08:33:10 AM »
A little update!

First off, containers!


In the past these containers would carry all sorts of goods, from local foodstuffs, building materials or even lifestocks to exotic off-world products. After the cataclysm this all came to a stop; there is no more off-world shipping and trade between the castle cities is almost nonexistent. Many of these containers have been abandoned, or have been converted for other purposes, be it makeshift fortifications or even impromptu homes.

At the moment this container is a solid model of 42mm x 42mm x 78.5mm. In other words: quite a chunky beast. I am very tempted to hollow it out and make the door removable. It would then also mean I'd be forced to do some internal detailing, which might be pretty cool.


"There's no such thing as too many bolts, boys!", Yeshik yelled at the others as they were in a hurry to put everything together. And he was right, the structure couldn't be strong enough. It had to withstand the elements, mighty storms that could tear a man to shreds. But the building also had to be strong enough to hold off the creatures that stalked the wastelands...

As you can see I've been adding some more detailing to the building, a rivet or two! There's one major problem I'm running into at the moment: this building consists of 60 parts in total, this includes outer walls, beams on the corners, floors (also inside, not on the groundfloor though), ladders (still need to be made), balcony walls, etc.

Personally I think it's a bit too many parts, production costs would simply skyrocket if I would want to actually print and cast it.

I've been looking at Mantic's stuff, it seems rather affordable and a lot more standardized. One thing that really bugs me about Mantic's stuff is - even though the quality looks great - that it looks rather flimsy to me. I guess I'm more influenced by the 2nd edition era and Necromunda bulkheads, big sturdy stuff!  And then I'm looking at the Dust Tactics: Warzone Tenement, which looks very impressive and is quite affordable as well. So it is possible to make something partly modular and affordable without becoming an overly standardized and almost flimsy thing like Mantic's kits.

I guess the challenge now lies in reducing the number of parts, any suggestions?
Bits Blitz - the place to be for all your bits needs!

Offline Malika

  • Full Member
  • *
  • Posts: 1563
    • Loc: Netherlands
    • Bits Blitz
Re: Modelling bits for 3d printing
« Reply #98 on: August 15, 2014, 01:56:05 PM »


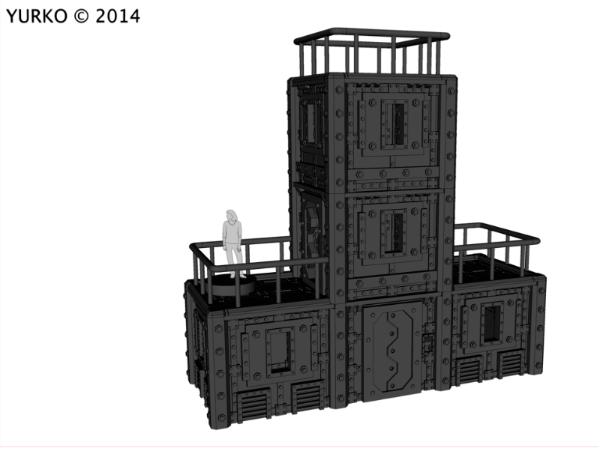
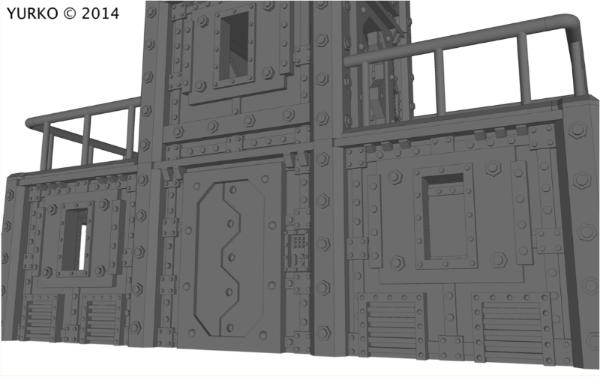
Been tweaking the building design a bit. The most noticeable are probably the new railings. Furthermore I've fused some of the parts together (walls with corners), meaning that this building now consists of around 36 parts (this includes separate doors), rather than 60 something.


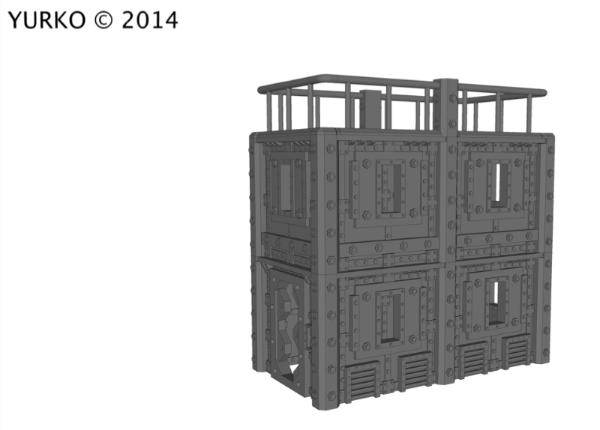
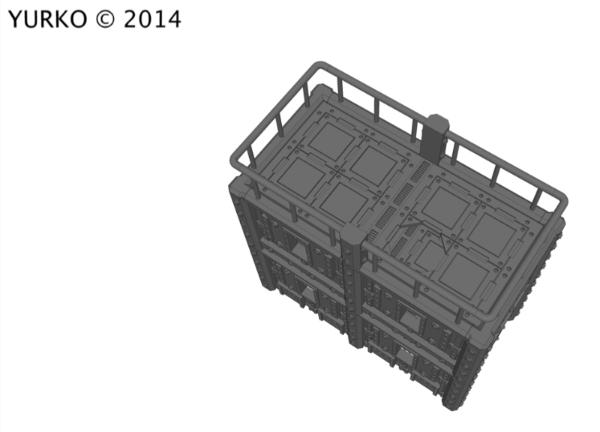
Also started working on a second building, very much in the same style as the previous building, only with some of the wall components being slightly different. You can't really see it since the aesthetic design is identical, I guess I'd need to have some pics of the separate components. It consists of 27 parts (including a separate door).


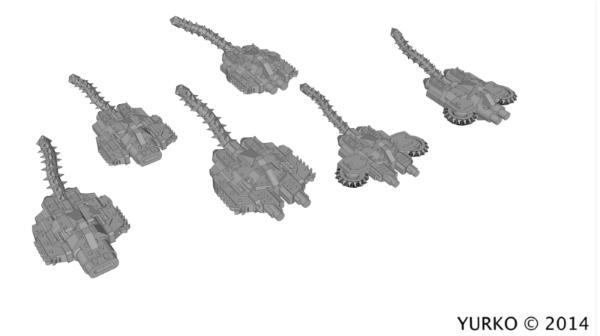
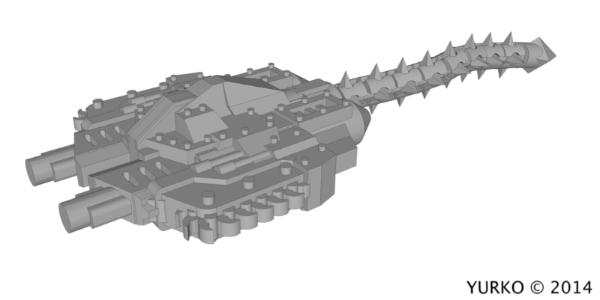
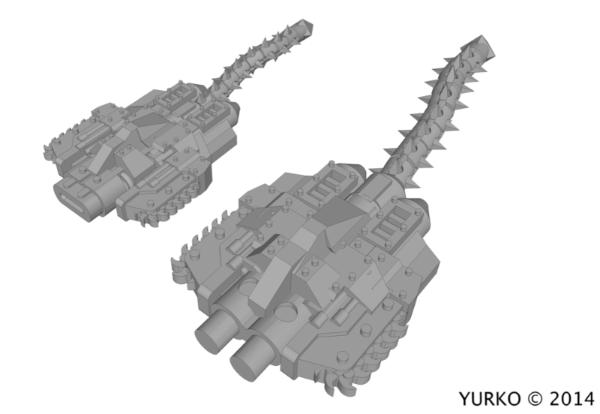
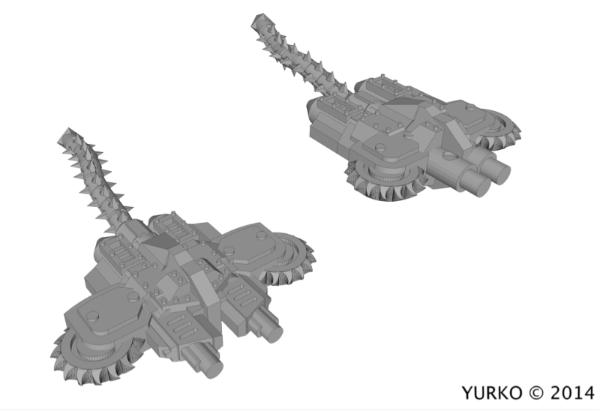
I've also continued working on these buggers. As you can see the tails have been modified a bit to be even nastier. The bodies have also been given some extra detailing, including tons of rivets. The details need to be tweaked here and there before they're considered ready.

I've been pondering a little bit about gaming in this setting. Not fully sure if I'd totally want to reinvent the wheel and come up with my own rules, or let players simply use their own game systems (modified versions of Necromunda or Mordheim - the whole Inq28 craze - come to mind here). Another option would be that it could be playable using Warspike, but since that's still very much a WIP, with nothing really set yet, it might be tricky. More musings on that here. However, I'm very much pro the idea of a narrative set up, maybe even with a GM in there. Well NPC's are probably a must since those mechanical creatures can't really be tamed, they are more like robotic wildlife!

This world being  wrecked by some great disaster, the hive-like cities reduced to nothing more than sort of post-apocalyptic castles, I imagined the early 'factions' to be simply warbands who leave the castle, either to explore, conquer land, go on quests, etc. The player gets a budget to create the warband, which then expands further down the same (similar to Necromunda, GorkaMorka, etc). I just like the idea of players being able to go very crazy with this. From warbands consisting of just a single uber-powerful warrior (maybe with squires/servants around him/her) to more 'professional' units and so on. NPC's would play a rather big role in this thing as well, so often it isn't just warbands fighting against one another, but in many cases it's them working together to finish the campaign (how very D&D!) with the GM controlling the robotic wildlife, techno undead, surface dwelling villagers, off-world agents, etc.
« Last Edit: August 15, 2014, 02:00:12 PM by Malika »
Bits Blitz - the place to be for all your bits needs!

Offline Malika

  • Full Member
  • *
  • Posts: 1563
    • Loc: Netherlands
    • Bits Blitz
Re: Modelling bits for 3d printing
« Reply #99 on: August 15, 2014, 09:51:18 PM »
I thought it might also be nice to give you guys an 'inside' look at the buildings:


As you can see, the insides are also detailed. All that needs to be done now is to add some detailing to the ceilings, and then the model is as good as done. Well, I'd need to check if the whole thing is water tight and all that, but that's something one has to do with every model anyways!

In the meantime I've started on something new...

It's still at its very early stages of infancy, just recycling some models I've had lying around. You might recognize the buzz wheel, the tentacles are new. Right now only the basic shape is done, all the details will need to be filled in now. So lots of rivets, tubings, spikes, etc. will need to be added to both the wheel itself as to the tentacles. The endings of the tentacles will also need something nastier, maybe large spikes or something.

Sadly enough, this is also where it's becoming rather problematic. The tentacles consist of lots of components, which - all put together - make SketchUp run REALLY (understatement) slow. It's like I'm operating the desktop computer I used to have when I was still living at my parents place over a decade ago. So I need to figure something out for this, or otherwise totally redo the tentacles. I have been tempted to just take the tail of the hounds/skyrays and just beef them up a bit. Need to ponder a bit about it, especially since I did put in some time to make the tentacles you see in the pic above...

To give you an idea what kind of creature this is going to be, it's basically a lone-wolf kinda unit, riding around the wastelands, hunting for humans. If it doesn't crush its prey with its wheel, the tentacles will take are of it. The creature also uses the tentacles to grab onto walls and such to climb on them or catapult itself across larger distances. I still need to have some sort of intimidating sounding name for this creature. At the moment the design has been saved under the name "Squidwheel 1.0". Hmm...Squidy?
Bits Blitz - the place to be for all your bits needs!

Offline Malika

  • Full Member
  • *
  • Posts: 1563
    • Loc: Netherlands
    • Bits Blitz
Re: Modelling bits for 3d printing
« Reply #100 on: August 16, 2014, 11:42:45 AM »

For the more perceptive ones, I've 'recycled' ('upcycled' might be a better word in this case) the tail design I've used on the Skyrays and Hounds. The main reason was that the previous version of the tentacles were just unworkable since my computer couldn't handle it.


However, it would have been a bit lazy if I simply used a magnified version of the tail and didn't modify it in some way. As you can see, I've been adding some rivets on the now-tentacles as well; this kinda detailing would be impossible on the tails since they're 50% smaller).


Also the spikes themselves at the end of the tentacle have been modified: longer and sharper, but also with some detailing. I'm still a bit curious is these would be printable since the printer might see it as too thin. I'll try to throw it in Shapeways as soon as possible just to see what their checking-system says (don't have the budget yet to do test-prints).


I just noticed a slight mistake on my part. The human model is a bit bigger than it's supposed to be - 33mm instead of 30mm. The reason why I picked 30mm instead of 28mm is twofold: (a) 28mm scale models tend to be 28mm from the bottom of a model's feet to its eyes; (b) there has been an upscale creep throughout the years, meaning "28mm scaled" models are often around 30mm or even 32mm tall. Just put your old Imperial Guard or Space Marine models next to the contemporary ones to see what I mean. ;)

The 'Squidwheel' (still don't have a better name for it yet) is about 60mm tall and stands on a 40mm round base. One challenge point is that the buzz wheel isn't the most stable of objects to be put on a base like that. So the plan is to design a base-surface for this one, which will probably be the ruined remains of a surface dweller's home or something.

However, this is where I need your help. Since I don't have my old bits box anymore, what are the exact dimensions of a round base? So ok, 40mm diameter on the bottom. But the top diameter is slightly smaller, how much smaller? And how tall is a standard base? Up until now I've been using 5mm for that, but I've got a feeling it's a bit less. Help?
Bits Blitz - the place to be for all your bits needs!

Offline Malika

  • Full Member
  • *
  • Posts: 1563
    • Loc: Netherlands
    • Bits Blitz
Re: Modelling bits for 3d printing
« Reply #101 on: August 16, 2014, 04:33:09 PM »
Ok, another update!


First of all, I've decided to put the fellow on a larger base (65mm). A 40mm round base was just a bit too small. Not only balance wise, but also since this machine just needs a bit more space around it.

Furthermore I've cleaned up the tentacles a bit for easier casting, but they also look better this way (at least in my humble opinion).
Bits Blitz - the place to be for all your bits needs!

Offline Malika

  • Full Member
  • *
  • Posts: 1563
    • Loc: Netherlands
    • Bits Blitz
Re: Modelling bits for 3d printing
« Reply #102 on: August 17, 2014, 09:10:39 AM »
I felt like doing these quick shots just to give you an idea of scale. Clicking on the pictures will take you to the Dakka gallery where you can zoom in a bit on them.


You might not notice it, but I've increased the size of the skyrays with about 50%. Whilst this does mean I'd have to revisit some of the details, the model's size does seem to make more sense to me now, especially when compared to the other models.


The hound looks a bit weird from this angle, too static almost. I need to look at some more wolf/hound models to see if those have a similar problem when taken from an angle like this.


Little by little the squidwheel (why am I thinking of giving it some cliched name like 'Dominator' or something?) is getting there. It'll still need more detailing, and I would like to also add some vents or something along those lines...


SketchUp's human scale model is a flat picture, and whilst it'll turn automatically when you turn the 'camera' around, it doesn't really do that when you're doing a top view with parallel projection. Thus the silly looking line on that 25mm round base...
Bits Blitz - the place to be for all your bits needs!

Offline Malika

  • Full Member
  • *
  • Posts: 1563
    • Loc: Netherlands
    • Bits Blitz
Re: Modelling bits for 3d printing
« Reply #103 on: August 18, 2014, 12:19:22 AM »

Ok, felt like playing with the styles over at SketchUp, which allows me to make the stuff look more like artwork. Man, I need to learn Photoshop and Illustrator!

However, in the meantime I did a little bit of work on the Squidwheel:


Also, did you notice the base the human is standing on? I couldn't resist and made a bunch of 25mm and 40mm round bases!
Bits Blitz - the place to be for all your bits needs!

Offline Malika

  • Full Member
  • *
  • Posts: 1563
    • Loc: Netherlands
    • Bits Blitz
Re: Modelling bits for 3d printing
« Reply #104 on: August 22, 2014, 04:38:06 PM »
I've finished up the first batch of bases:

The top three ones are 65mm, the ten middle ones are 40mm and the bottom fourteen are 25mm. I could of course make many more variations with also more stuff sticking out and such, maybe even cavalry bases, 30mm and 50mm ones and even bigger stuff for titans, but doubt it would be that relevant. 25mm works for normal infantry, 40mm for larger models and 65mm for chunkier stuff.
Bits Blitz - the place to be for all your bits needs!